Why Your Toilet Won't Stop Running
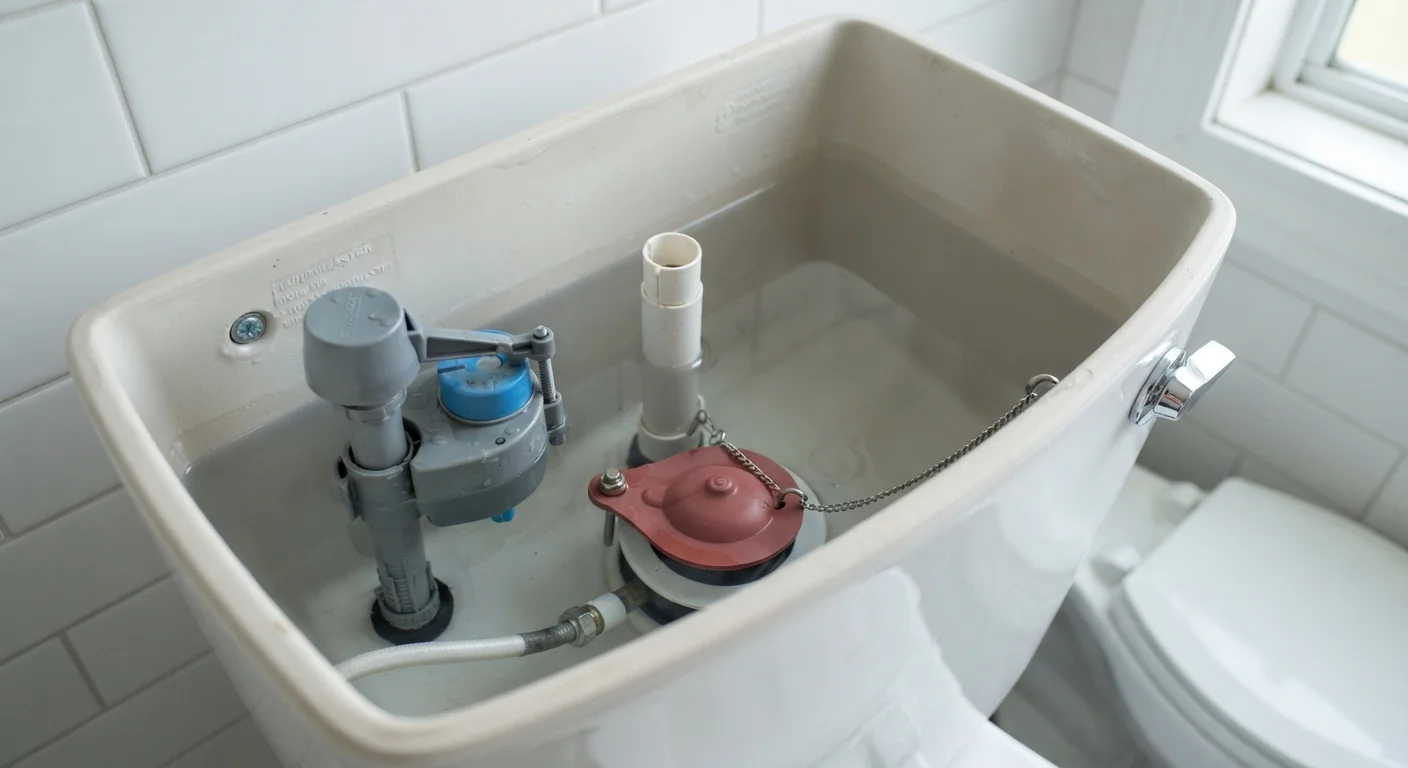
A toilet that runs constantly - or cycles on and off on its own - is usually losing water from the tank into the bowl. The tank is designed to hold a set amount of water between flushes, sealed by a rubber flapper that covers the flush valve opening at the tank bottom. When that seal fails, water trickles continuously into the bowl, triggering the fill valve to keep refilling the tank. The result is the familiar hissing or running sound you hear even when no one has used the toilet.
There are three likely culprits:
- Worn or warped flapper - Rubber degrades over time, especially with chlorinated water. A flapper that no longer lies flat allows water to escape.
- Faulty or misadjusted fill valve - If the fill valve fails to shut off, water overfills the tank and drains out through the overflow tube into the bowl.
- Float set too high - The float tells the fill valve when to stop refilling. If it sits too high, the water level never drops below the overflow tube, so the tank drains constantly.
Identifying which of these is responsible before reaching for any tools saves significant time and avoids replacing parts unnecessarily.
What you will need
Step-by-Step: Diagnosing and Fixing the Problem
Follow these steps in order. Most homeowners resolve the issue entirely within the first three steps. Gather your tools before beginning.
Adjustable pliers
Used to loosen and tighten the fill valve lock nut when replacing the fill valve.
Sponge or towels
Used to soak up residual water left in the tank after shutting off the supply.
Replacement flapper
Replaces a worn or warped flapper that fails to create a watertight seal at the flush valve.
Replacement fill valve
Replaces a faulty fill valve that causes the tank to overfill or fail to refill correctly.
Bucket
Catches water drained from the tank during the repair to keep the bathroom floor dry.
Diagnose the cause of the running water
Remove the tank lid and set it safely aside. Listen and observe carefully. Add a few drops of food coloring to the tank water and wait 10 minutes without flushing. If color appears in the bowl, the flapper is leaking. If the water level is at or above the overflow tube (the tall vertical tube in the center of the tank), the float or fill valve needs adjustment. This step tells you exactly which part to address.
Shut off the water supply and flush
Turn the shut-off valve clockwise until it stops. Then flush the toilet to drain most of the water from the tank. Use a sponge or towels to remove any remaining water from the tank bottom. This gives you a dry, clear workspace and prevents accidental spills when disconnecting parts.
Replace a worn flapper
Unhook the old flapper from the two pegs on either side of the flush valve and disconnect the chain from the flush handle arm. Bring the old flapper to the hardware store to match the size - most toilets use a standard 2-inch flapper, but some use 3-inch models. Snap the new flapper onto the valve pegs, reconnect the chain, and leave about half an inch of slack in the chain. Too much slack prevents a full flush; too little slack keeps the flapper from sealing.
Adjust or replace the fill valve and float
If your diagnosis pointed to the fill valve or float, start by adjusting the water level. On a ball float (the round ball on an arm), bend the arm slightly downward or turn the adjustment screw to lower the float so water stops about one inch below the top of the overflow tube. On a cup-style float (which wraps around the fill valve shaft), pinch the clip and slide it down. If adjusting the float does not stop the running, replace the fill valve entirely: unscrew the water supply line from the bottom of the tank, use pliers to remove the lock nut, pull out the old valve, and install the new one according to the manufacturer's included instructions. Reconnect the supply line and set the water level as described above.
Restore water supply and test
Turn the shut-off valve back on slowly and allow the tank to fill completely. Watch the water level to confirm it stops below the overflow tube. Flush once and observe: the tank should refill and stop without any water running into the bowl. Dry the outside of the supply line and the base of the fill valve with a towel and check for drips after a few minutes.
When to Call a Plumber
If the toilet continues running after you have replaced both the flapper and the fill valve, the flush valve seat is likely damaged - a repair that typically requires more disassembly and specialized tools. A licensed plumber can assess and resolve this quickly. Do not delay: a continuously running toilet can waste hundreds of gallons of water per day.
Avoid Forcing Corroded Parts
Old or corroded bolts, lock nuts, and supply line connections can crack porcelain or shear off if forced. If a component resists reasonable hand-tightened torque, stop and consult a licensed plumber rather than risk a more costly leak or tank damage.
Turn Off Water Before Removing Any Parts
Never disconnect the fill valve, flapper, or supply line while water is still flowing into the tank. Failing to shut off the supply valve first can result in uncontrolled water flow that is difficult to stop quickly. Always confirm the valve is fully closed by flushing and verifying the tank does not refill.